| Back | Home | Index | On |
Batteries come in a variety of types, with a variety of names, and costing various amounts. It is up to each boater to do their own cost – benefit analysis to decide what type of battery to use. I layout some of the types below:-
Nickel-iron & other non-lead based batteries
If you have a source for these that is not prohibitively expensive their long life and the ability to change a single faulty cell may make these ideal for domestic systems, but make sure the onboard charging system can cope and that the specialist service is available to you (Nearly every boatyard will have some idea how to deal with lead acid batteries, but probably not these). Because of these limitations the rest of the section will assume lead-acid batteries.
Engine starting
The construction of these batteries usually involves a number of thin plates, so when the plates "shimmy" under high current flows the outer surfaces suffer as little stress as possible and consequently shed minimal amounts of their material.
Deep Cycle
These batteries are designed to provide fairly low current flows for long periods, so are ideal for domestic batteries. They are likely to have thick plates with each plate in a fibreglass pocket that holds any material the plate sheds in position.
Using either of the above types for "the other" duty is likely to result in a shortened life.
Traction or semi-traction batteries
These may have plates formed as tubes or rods, they will be expensive, but have long lives if correctly sited, cared for, and charged.
They are not suitable for engine starting.
Maintenance Free or Sealed for Life.
As their name suggests there is no maintenance apart from keeping the tops clean and the terminals dressed.
They are said to offer low self-discharge when stored, so may offer advantages if a boat is to be abandoned for the whole winter period.
The only way ordinary folk have of testing them is by voltmeter, which can be confusing to interpret.
They may explode if subject to very high rates of charge or discharge because their cell venting system may not be able to keep up with the amount of gas produced.
It is not possible (in most cases) to top them up.
When totally discharged (like by leaving a light on) they may be impossible to charge with "normal" equipment.
Gel batteries
The acid is in a form of jelly, so it cannot leak out. These will be expensive, but are said to suffer low self-discharge rates. They may not be amenable to high charge rates, but cannot spill.
These may be ideal for ocean going yachts men who may spend a good deal of time with the boat nearly horizontal, I suspect their cost would not make them suitable for most inland boats.
Leisure batteries/Dual purpose batteries
Take care with these – read the small print.
With the advent of Sleeper Cabs on long distance trucks, plus all the central heating etc that goes with them, the modern truck battery is expected to perform as both an engine starting battery and a domestic battery. This has lead to improvements in the technology that allows a single battery to undertake both roles.
They might not last as long as the specialist types, but will do a reasonable job in both applications.
A pure leisure battery is another name for a deep cycle battery so is unsuitable for starting, but the term is increasingly coming to mean Dual Purpose Battery.
Carbon batteries
At present there is only one well-known company offering these in the British market. The technology of mixing carbon fibres into the plate material sounds as if it is a real step forward. However, there would appear to be some very marked differences in experience of these batteries and the customer care associated with the company.
My own experience to date (two years from purchase) is that my meter readings indicate that many of the maker’s claims are true, but the question of battery life and cost-benefit are still open to question.
A personal recommendation
If I was forced to make recommendations for a boat’s batteries it would be as follows (at the moment):-
Inland and non-critical estuary/coastal use
Conventional wet, lead acid batteries, separate types for engine starting and domestic services. (I would be checking the life of the dual-purpose batteries over time).
Critical estuary/coastal and all offshore use
Very seriously consider Gel or Sealed for life batteries, but ensure you have reasonable access to adequate testing and charging facilitates.
A number of batteries may be linked together to give almost any combination of capacity and voltages, common examples are shown below.
 |
Two six volt batteries connected plus to minus – in series – to give 12 volts but with the same capacity as a single battery.
Two 12 volt batteries connected plus to plus and minus to minus – in parallel – to give twice as much storage capacity, but only at 12 volts (probably the most common method) You can keep adding batteries, plus to plus and negative to negative, to get the capacity you require.
Two 12 volt batteries connected plus to minus – in series – to give 24 volts but with the same capacity as a single battery.
Four six volt batteries connected plus to minus – in series – to give 24 volts but with the same capacity as a single battery. |
If you are having a new boat built, modifying one, or doing an extensive refit, the position of the batteries can have an impact upon their life. Narrow-boaters having a new boat built really should be prepared for firm "discussion" over battery siting.
Such equipment would be Starters, Alternators, Inverters and Electric Fridges.
Batteries that are left in even a partial discharged state will suffer a virtually permanent change in their plate material that will eventually make them useless. Guard against this at all times.
The correct level will be:-
There are two methods of testing batteries that "normal folk" can use:
Measuring the relative density (specific gravity) of the acid in each cell.
Measuring the battery voltage with an accurate (digital?) meter.
Exide UK have stated that the only way to make a definitive diagnosis of sealed batteries is with an expensive piece of automated test equipment that only battery agents are likely to have, so if you have gel or sealed batteries, you have to use the voltage method.
RELATIVE DENSITY or HYDROMETER TEST
USE THIS TEST WHERE POSSIBLE
If it is possible to gain access to the electrolyte this test will give the most reliable results. Many batteries are equipped with a simple built-in hydrometer, but it only acts on one cell, so is not a lot of use in finding faulty batteries.
RELATIVE DENSITY or SPECIFIC GRAVITY
Relative Density is a way of showing the density of a material by comparison with that of water. If a substance was twice as dense as water it would have a relative density of 2, if it was only half as dense as water it would have a relative density of 0.5. The lead acid battery electrolyte has a relative density of between 1.150 and 1.250, depending on state of charge and temperature.
Because things expand and contract with temperature the relative density is only correct if it is taken at 15oC. To be absolutely correct 0.002 should be subtracted from the reading for every 2o below 15oC, and 0.002 added for ever 3o above 15oC.
The instrument used to measure Relative Density is called a hydrometer.
HYDROMETER
The best battery hydrometers consists of a glass or plastic tube with a rubber bulb at one end and a rubber tube at the other. A graduated float inside the glass tube allows the relative density of the electrolyte to be measured when a sample is drawn up into the glass tube.
One side of the float is normally graduated between 1.100 and 1.300, whilst the other is often colour coded in bands to show Discharged, Half charged and Fully charged. You should always use the numbered graduations.
TAKE CARE WHEN WORKING WITH BATTERY ACID - it burns both you and your clothes.
THE TEST
Ensure the cells' electrolyte are up to level, this will ensure you can draw enough electrolyte into the hydrometer to actually float the float.
If the cells need topping up with distilled water place the battery on charge for a while to ensure the water is mixed with the electrolyte.
Wearing suitable protective clothing (rubber apron and goggles) or taking great care, draw a sample of the electrolyte from each cell in turn. Note both the reading for each cell and the colour.
The electrolyte should be clear, like water, if it is brown or grey it indicates that the plates in that particular cell are shedding material and the battery is therefore at, or nearing, the end of its life.
The readings taken indicate the state of charge of each cell, a faulty cell will have a lower state of charge so the battery condition can also be ascertained.
If the readings differ by more than 0.050 the battery should be scrapped. (I have seen the figure 0.025 in Lucas literature).
The readings of all the cells should be averaged (often the state of the battery is quite clear without averaging) and the table below shows the state of charge for given relative densities.
To be absolutely accurate correct your readings to 15oC.
Fully charged 1.280
Half charged 1.200
Fully discharged 1.150
If you are unsure about the battery condition there will be no harm in topping up, charging and re-testing it.
VOLTMETER TEST
This is a second best test because there is ample scope to get false readings, if you understand it, however, it will allow you to use the boat’s voltmeter to make quick checks of battery state of charge and condition.
**** SURFACE CHARGE **** Very Important
Almost as soon as a battery starts to charge, the surface molecules on its plates become fully charged, even though the rest of the plate is discharged. This allows the battery to produce the "fully charged" voltage from these few molecules. To prevent this giving a false reading a discharging procedure must be carried out immediately BEFORE taking the voltage reading.
The "carbon battery" supplier says their batteries do not suffer from surface charge. My boat’s voltmeter says something different. Following the discharge procedure will do no harm.
The Test
First do something to remove the surface charge. What you do depends upon which battery you are testing.
Domestic battery
Turn on all the lights, fans, and pumps for a while. The more batteries you have the
longer you need to leave them on for. I would suggest a minimum of 30 to 40 seconds.
Having got rid of the surface charge, connect the voltmeter across the battery and take a reading.
Less than 12.2V = Very discharged
12.2V - 12.5V = Part charged
More than 12.5V = Fully charged.
The engine battery’s capacity is easy to determine – simple ask the engine maker/mariniser/dealer. For low speed displacement craft 110 amp hours will usually be ample.
The other batteries are more problematical and need calculations. Before you start you need to know:
Having got all the above you must do a power audit.
Take each piece of equipment in turn and multiply its current draw by the time it is on during the period in hours. Then total your answers. My power audit is shown below.
Device |
Amps drawn |
Hours used |
Amp hours required |
Fridge |
2.3 |
12 |
28 |
Internal lights |
6 x 1.5 = 9 |
3 |
27 |
Water pump |
4 |
2 |
8 |
TV |
3 |
3 |
9 |
TOTAL |
72 |
The 12 hours for the fridge assumes the thermostat will only let it run for about 50% of the time.
This shows that I need 72 Amp capacity from my batteries; unfortunately the problems now start because of limitations within the batteries and the charging system.
When a battery is discharged to 50% its voltage will become so low that it may be considered as useless. Of more importance is the fact that whenever a battery is discharged to more than 50% its life is shortened.
Maximum charge level
The basic voltage regulator supplied in most "marine" and any other alternator is built down to a price for automotive use. All the automotive market is willing to pay for is a charging system that will quickly replace the electricity used for starting ready for the next start, either later that day or the following morning.
The voltage needed to fully charge a battery would "boil" the electrolyte away and damage the battery if it is not carefully monitored. The monitoring is expensive, so automotive alternator regulators are set to deliver a safe voltage that, unfortunately, will only get the battery about 80% of fully charged.
So we now know that the 72 ah capacity is in fact the capacity of only 30% of the battery, so to calculate how much battery capacity we really need the calculation is
72 ÷ 30 x 100 = 240 amp hour capacity required
Thus we need to install over three times the capacity we first calculated.
We need to install over three times as much capacity than the calculation suggested. Even if we do this we will always leave the battery 20% discharged.
Remember the piece about sulphation? – where the discharged plates destroy themselves
if left unused and at less than full charge.
This means that our 240 ah battery bank in the first autumn will only be a 192 ah bank next spring and a 153 ah bank the following year and so on. Now if we could only get the batteries nearer to 100% charged, then things would be better.
We can as long as we spend some money and fit an advanced alternator controller (more later). These are much more sophisticated voltage regulators that will get the batteries to about 98% of full charge.
I would advise keeping the original calculation (240ah) and using the difference as a safety margin to allow for unexpected stops and gradual battery deterioration, however the new calculation would give a battery capacity needed of:
72 ÷ 48 x 100 = 150 amp hour capacity required – and far less sulphation.
How to make up the capacity required.
Batteries can be obtained in 6v or 12v and each in a variety of capacities.
You can connect the positive of one 6v battery to the negative of another 6v battery to give 12 volts. You can also connect the positives of two 12v batteries and also the two negatives to still give 12 volts, but with twice the capacity. In my view it really does not matter how you make your capacity up, although I would use only one type of battery in a bank.
It is probably far more important to look at what is easily available in your cruising area, and to make sure you can lift and manoeuvre the batteries without too much strain.
I suspect that banks of 110ah 12v capacity batteries may be the best one can do.
(see hydrometer tests above).
It can be difficult to get a high enough load on domestic batteries.
CHARGING TIME AND ALTERNATOR OUTPUT
Alternators when first started will deliver up to 20% more charge than their rated output. This falls to the rated output so quickly that it can be ignored. From that point onwards the charging graph will look like this
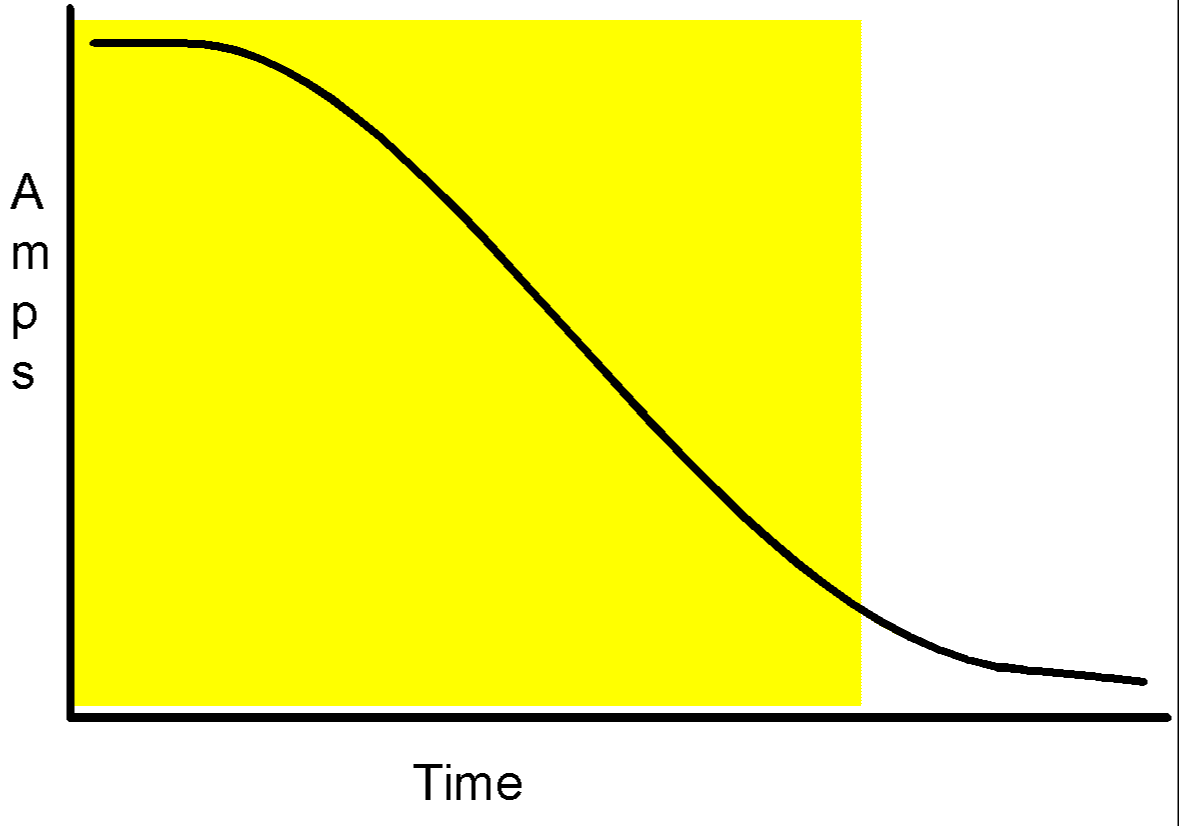
The charge rate starts at the rated output then starts to drop. Eventually it will level off, at a low level, where it stays, maintaining the batteries’ level of charge.
If you think about the charging curve in the shaded square, you will see that the average charge is about half the alternators rated output, so in the absence of any better measure, we must take half the alternators rated output as the figure for our calculations.
If you run the engine for longer, no harm will be done, its just that we must find a way of relating an alternator’s rated output to a useful charge rate.
Example
My alternator is a 60 amp unit, this gives 30amp output for calculations
My "use period" is 24 hours.
My "minimum running period" is 2.5 hours and usually longer.
This gives me 72ah ÷ 30 amps = 2.4 hours charging time.
Some allowance must be made for the time it takes to start the charging process, but my 60 amp alternator is near enough for me, and over four years with 2 x 110ah domestic batteries I have not been let down – yet!
Maximum charging current.
Conventional wisdom in automotive battery charging circles is that it is bad practice to charge a battery at more then 10% of its amp hour capacity. However, this goes out of the window as soon as its put on a car and the alternator is left to its own devices. I have often seen charge rates at 120% of rated capacity for short periods.
I think its true to say that the higher the charge rate the more the battery life may be compromised, so its probably wise to limit the maximum average charge rate to about 20 to 30% of battery capacity.
If you have been sold one of the 150 amp alternators (probably without good reason once you have done your calculations) you may well have to increase the size of battery bank to lower the charge going into an individual battery.
My bank consists of 2 x 110ah domestic batteries and 1 x 110ah engine battery, so I am happy that my 60 amp alternator charges at about 20% of capacity in the early stages of charging.
ELECTRONIC INSTRUMENT CIRCUITS
Radar, Echo sounder, GPS, VHF, etc.
The problem with this type of component is that if its inadequately designed as far as its power input is concerned, any voltage pulses caused by things like motors running, relays being turned on and off, or even an electric horn being used can be passed into the units to give false readings.
Batteries tend to damp out such pulses, but they can still cause problems.
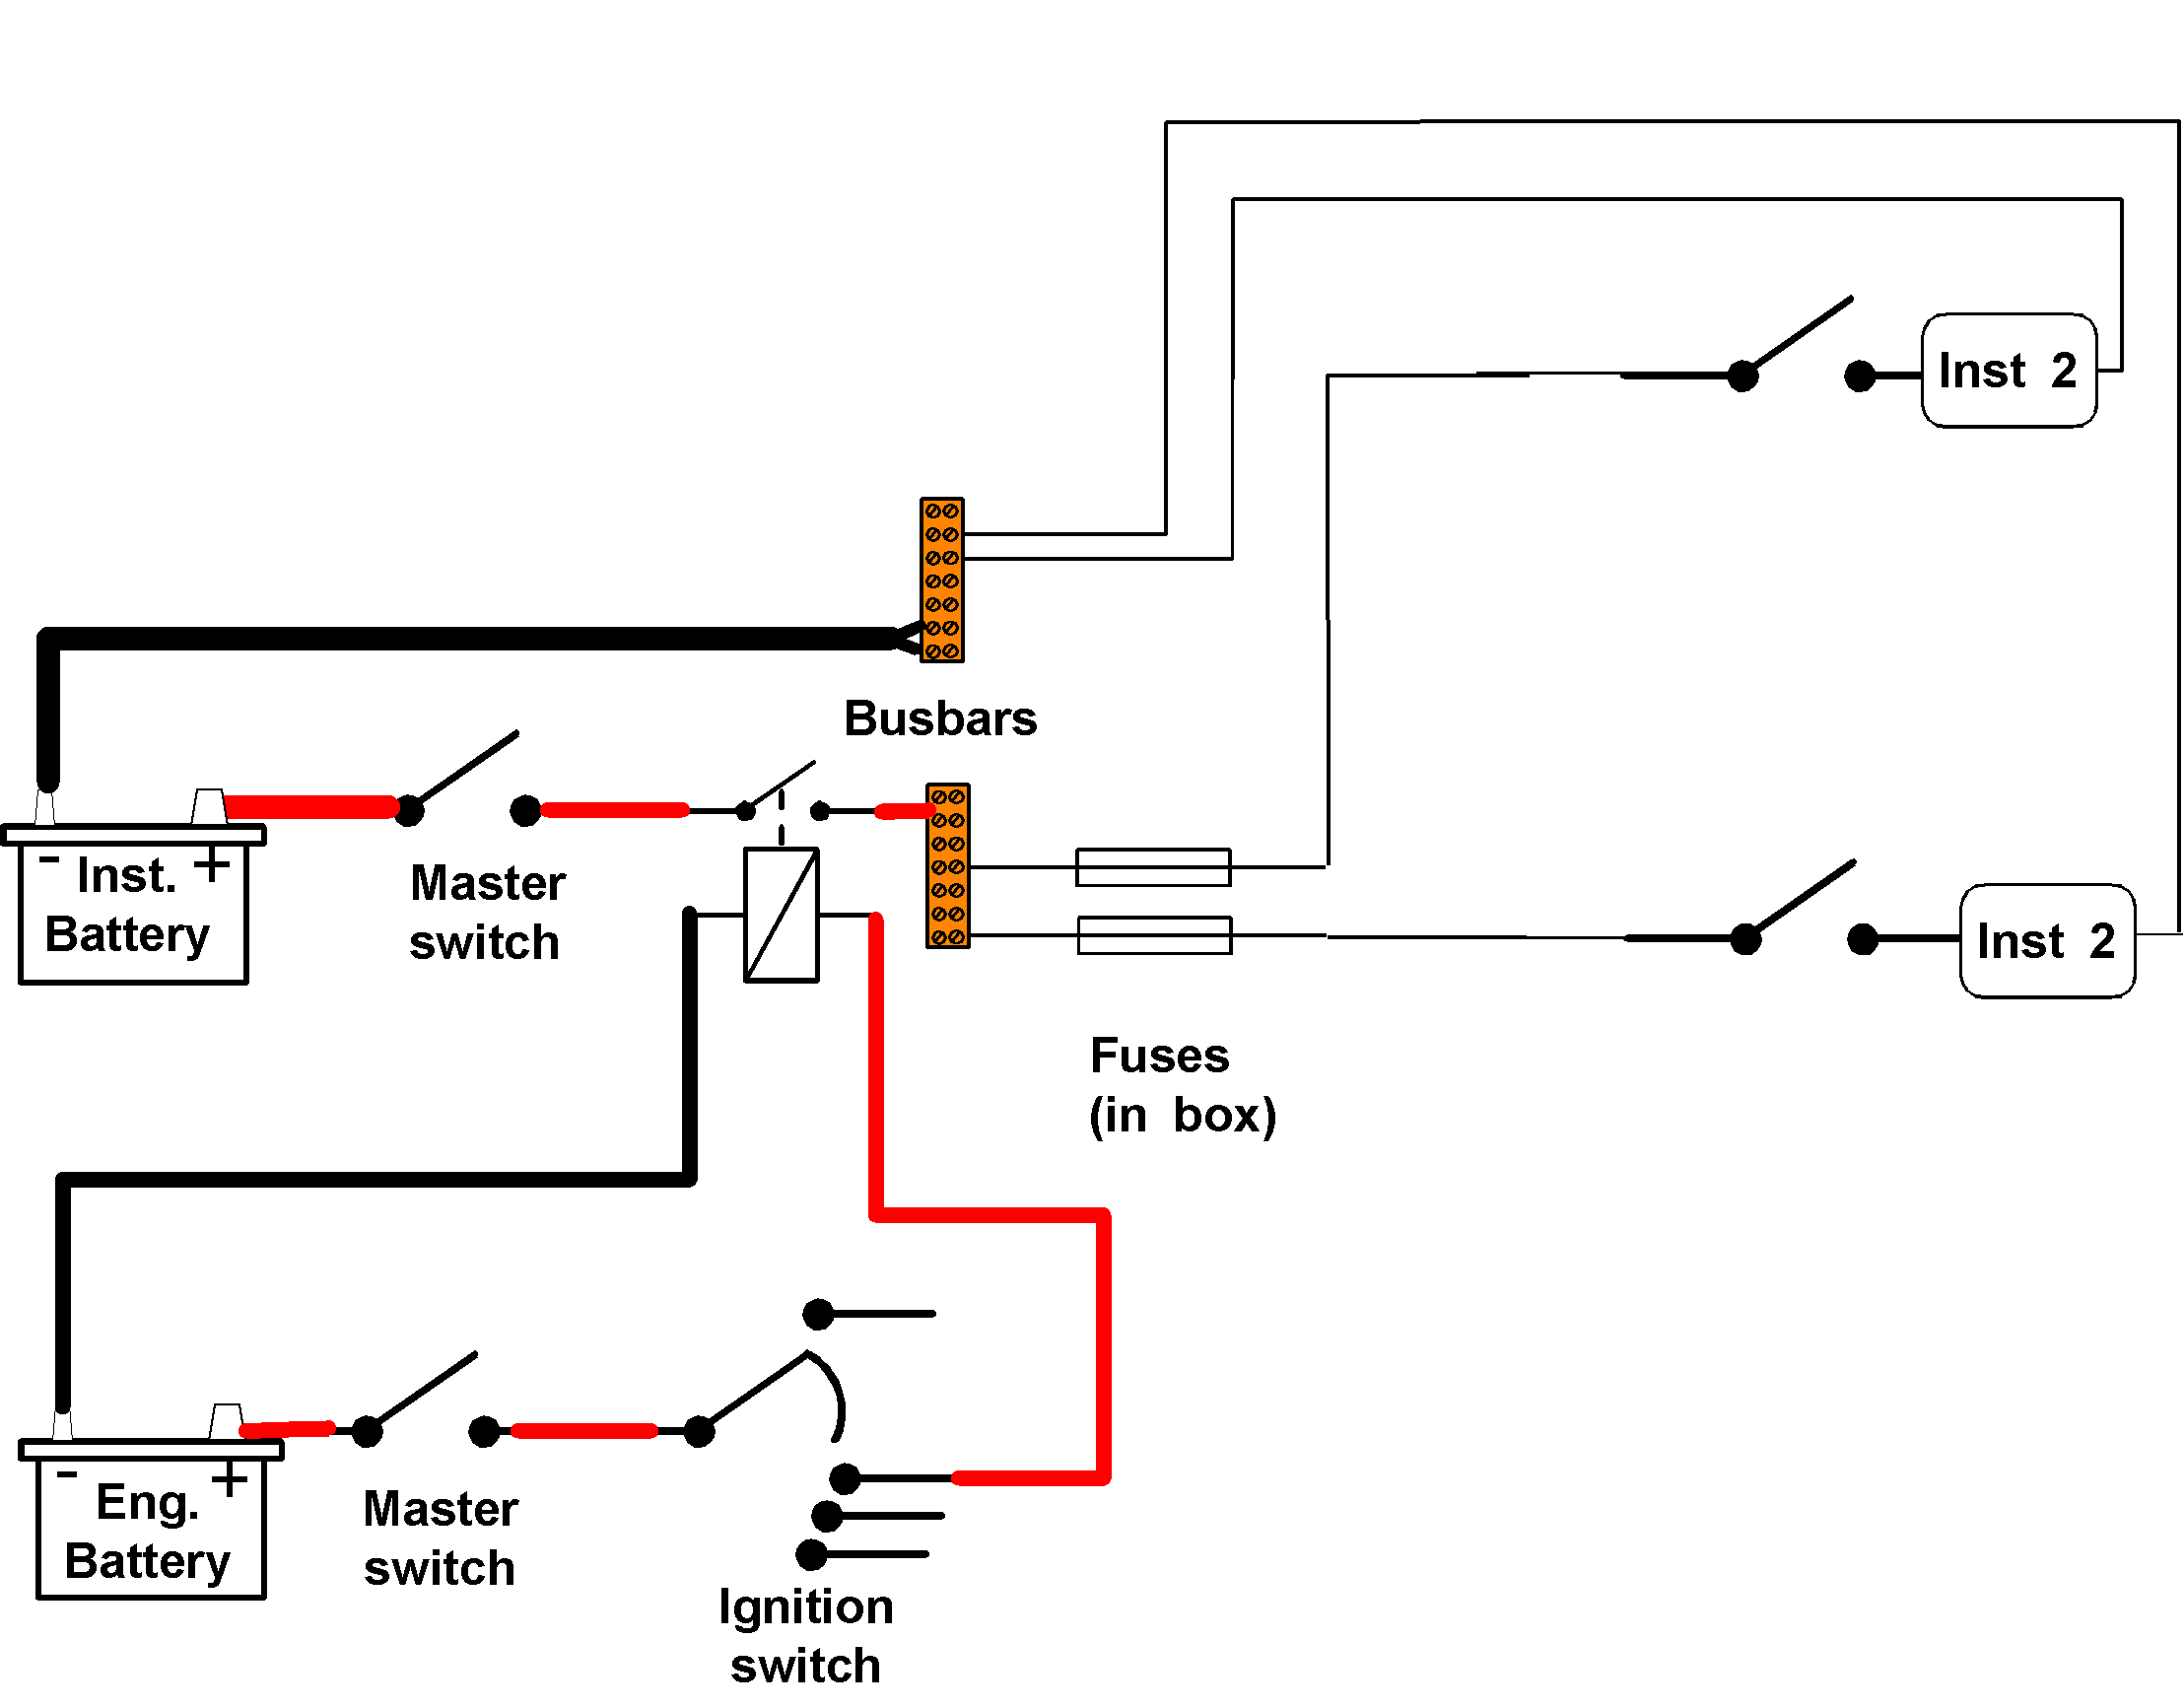
Seriously consider supplying all this type of instrument from a separate battery, so any pulses have to get past two batteries (say the domestic battery and the instrument battery) – the charging connections will join all battery banks at some time or another.
Aerial connections and sensing conductors.
One hopes that these all use screened cables to try to prevent cross circuit interference, but do not rely upon it, use physical separation and ensure all crossing cable cross at right angles.
Certainly try to keep transmitter aerial leads well separated.
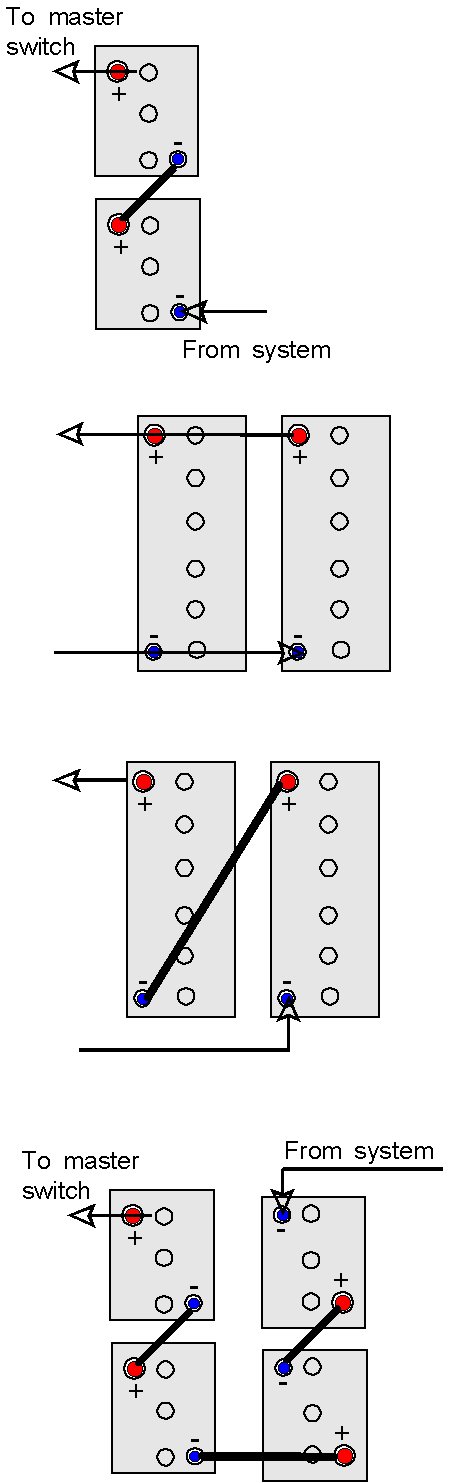
Connecting the components
The manufacturer should supply you with circuit diagrams and specifications for cable, connectors etc. Read them, understand them and stick to them.
Otherwise treat them as domestic circuits.
Battery +
> + Busbar > Fuse > Instrument > - Busbar > Battery -
Ignition switch control
On many small craft it may be felt that there is less danger of flattening batteries by forgetting to turn such instruments off if they are controlled via the ignition switch (probably not the VHF).
To accomplish this with a separate instrument battery an ignition feed needs to be taken to a relay, and the relay is then used to turn the instruments on and off.
Operation
It looks a bit complicated, but whenever the ignition switch is turned to the ON position an electromagnet in the relay closes the relay’s switch, supplying current to the instruments.
When the ignition switch is turned OFF, there is no longer any magnetism, so the relay switch opens, turning the instrument circuits OFF.
WARNING
Ensure the relay contacts are rated for well above the maximum current flows you have already calculated for the instruments and their circuit.
We will look more at the ignition switch and relays in the Engine Electrics section.