| Back | Home | Index | On |
We should now have the engine running, so it is time to get the battery charging. To do this we need to connect the alternator.
Unless one has a very basic boat where the charging system is only used to charge an engine battery for the next start a dynamo is not really up to the job. In any case dynamos became obsolescent over 30 years ago service and parts will be very difficult to find.
The original alternators fitted to most British marine/marinised engines from the late 1960s were the Lucas 10AC or 11AC, the 11AC having a higher output. These alternators used external voltage regulators, energising relays, and warning lamp controls. Many used a "rising oil pressure switch" to energise them when the engine started and thus produced oil pressure. Later their control system was modified to use a special relay in place of the warning lamp control. Even if you have one of these units, the benefits of fitting a modern alternator with its much simpler circuit after a failure, will outweigh the cost. The basic operation is as described below, except the alternator only uses 6 diodes and has an external regulator and energisation circuit.
Alternator Makes
The vast majority of alternators readily available today follow the same basic design:-
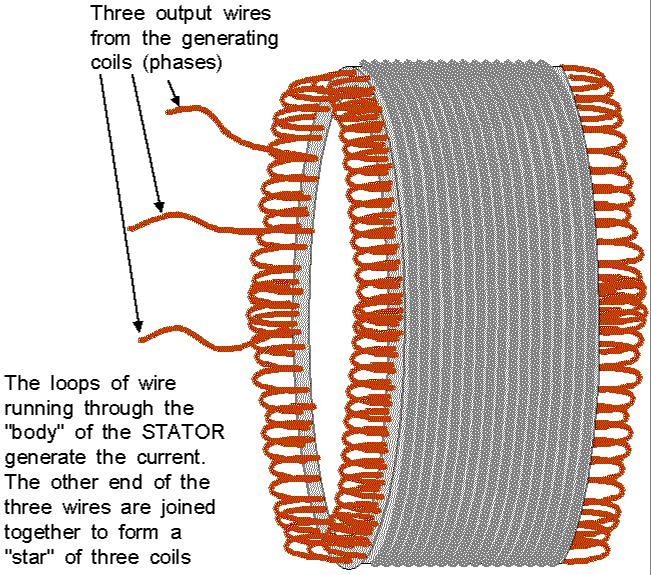
Three generating coils (phases) star connected.
Six main output diodes
Three field diodes feeding a spinning electromagnet
12 spinning magnetic poles (6 north & 6 south) but this can vary. You only need to know this if you want to fit or set up an alternator sensed revcounter.
Integral Voltage regulator
The requirement for a small current feed to the spinning electromagnet to start the machine generating.
The Leece-Nevill brushless units may not conform to this common design.
A number of older designs from Italy, France and Japan also differed with external regulators etc.
This book only deals with the common design.
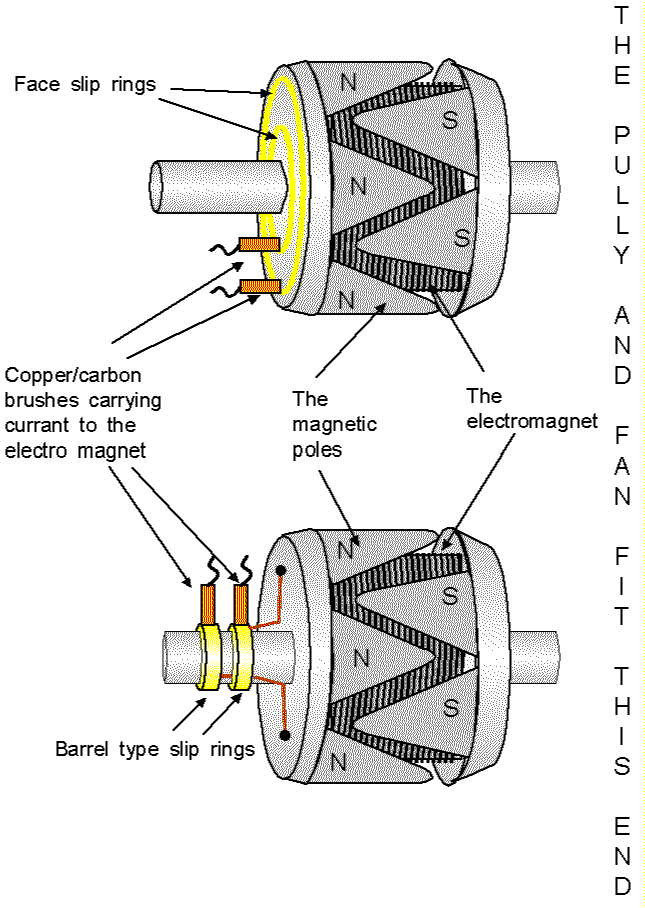 |
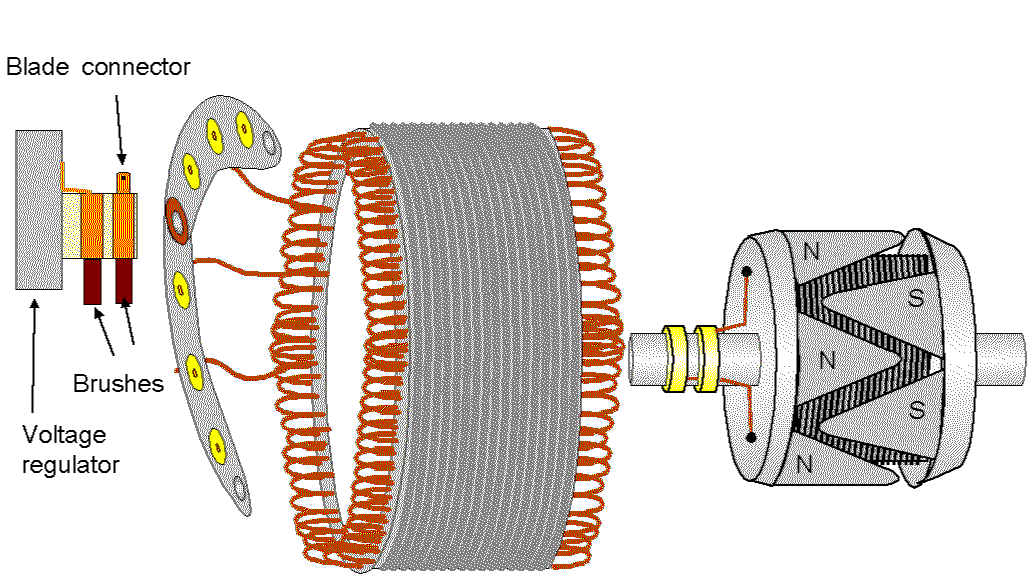
This is an illustration of the ROTOR. It
consists of:- a coil of wire to form an electromagnet Metal fingers that form the north and south poles. Two brass or copper slip rings, each end of the coil connects to one ring. A pair of small copper/carbon brushes. These are small rectangular blocks made from a mixture of copper and carbon dust. They pass current from the outside world to the spinning magnet. Two bearings, one at each end of the shaft. The brushes do wear over considerable periods of time, as do the slip rings. The ease of gaining access to the brushes indicates the potential for DIY brush changing. This is often very successful, but if the slip rings are worn the brushes might suffer very rapid wear. Always try to inspect the slip rings when changing brushes. The alternator drive belt drives the alternator from the engine crankshaft. |
| This is the main part of the outer body. It is made from soft iron
laminations – so do not go forcing them apart – and has three coils of wire
running through it. I know it looks like loads of small coils, but they form three big
coils. It is known as the STATOR. These coils generate the current when the rotor spins its magnetic field inside the stator. The stator is usually only clamped between the two aluminium end brackets. |
 |
The end brackets (known as the drive end bracket and the slip ring end bracket) play no part in the operation of the alternator apart from housing the bearings, providing a means of mounting the alternator to the engine, and also providing a convenient mounting for other parts.
The pulley is important – make sure it is not worn, and is small enough to allow optimum performance without overloading the engine at low speed – if it is too small (usually the crankshaft pulley is too big in the cases under discussion) the engine will not be able to rev up when the batteries are a bit flat!
The fan is vital because it draws cold (I hope) air through the alternator to cool it – try to ensure it gets an adequate supply of cool air.
If the blades run out on the radiuses of the fan, it can be driven in either direction. If they are at a slight angle to the radiuses look on the fan to find the direction of rotation arrow – make sure it is going in that direction.
If alternators are allowed to overheat they can easily damage their rectifier diodes.
Two typical diode or rectifier packs are illustrated on the next page.
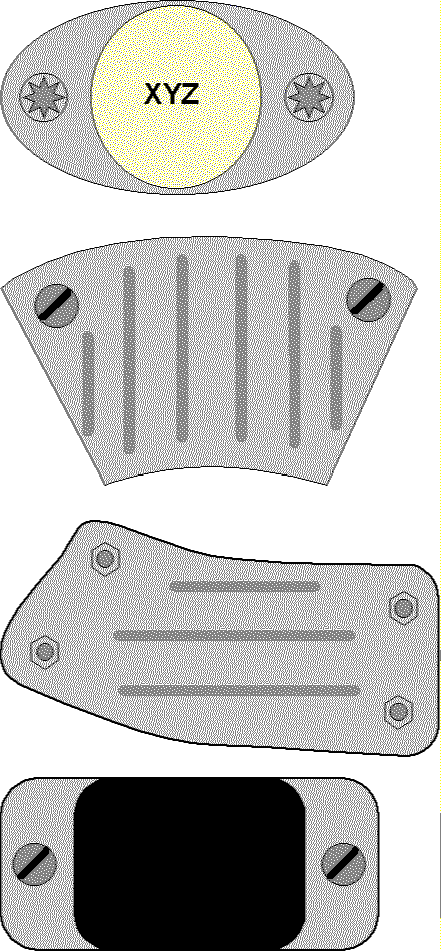
The diode or rectifier pack
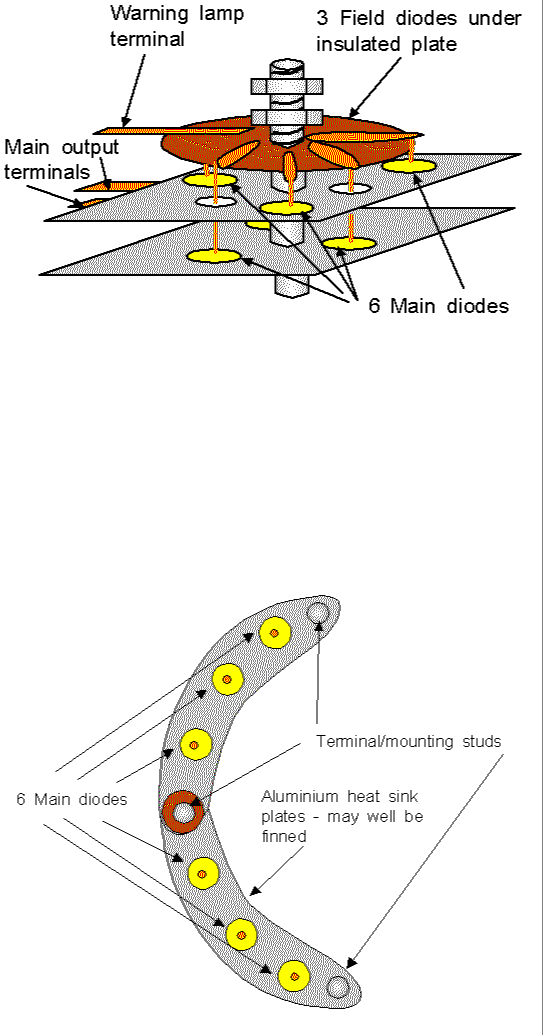 |
This pack is typical of
those found on LUCAS ACR alternators. These are the ones with a large plastic cover over
the brush/slip ring end. This one uses a plastic upper plate with metal conductor strips mounted on it . The field diodes are typical, small, electronic type diodes mounted either above (not shown) or below the plate. Earlier packs used another metal plate like the two lower plates. The stator windings (phases) are soldered to the metal strips.
This is a very generic design that gives a good idea of what most other diode packs look like. The heat sinks may well have extra terminals mounted upon them. The field diodes will again be small electronic types. These are often covered with rubbery "protection compound". |
In all cases the diodes must be kept cool – they generate an awful lot of heat when working at maximum output, so they are mounted on metal plates to conduct the heat away and the alternator fan is constantly drawing air over them.
NOTE – Take great care with engine soundproofing and "boxing in". The alternator MUST have a supply of cool air. In my view the best way of achieving this is to place a large baffled vent in the casing beside the alternator. This should have a minimum of six square inches area and 12 would be better. Then allow the engine to draw its combustion air through this vent, over the alternator. Just make very sure that there is minimal obstruction to the airflow for the engine.
Operation of the diodes
The diodes only let electricity flow in one direction. The stator produces ac current that keeps reversing its direction. By feeding this current through the diodes the current is blocked from flowing "backwards", and so it all flows one way, thus giving us the dc that we need for battery charging.
The way this is achieved using the 3 positive and 3 negative diodes takes quite a time to explain, so it is probably best just to accept that is what the diodes do. If you want any more information look up "Full Wave Rectification" in an encyclopædia.
The diodes always have to work in pairs, so it’s easy to see that the main diodes are paired into positive and negative. The three field diodes are all positive, and are also paired with the main negative diodes.
Any generating system needs the two main electrical units controlled:- current and voltage.
Current control or regulation is for the benefit of the generator. Its sole aim is to prevent the generator (alternator in our case) burning itself out by producing too high a current. Fortunately modern alternators are self-regulating for current so we do not need to use a current regulator. The self-regulation stems from the fact that ac current is generated, which produces a pulsing magnetic field around the generating coils. This pulsing magnetic field produces a "back voltage" that gets higher as the current flow increases. The result of this is that the higher the output, the lower the maximum voltage the alternator can produce.
As the alternator output gets to maximum the voltage it produces will be down to about 12 volts (not enough to charge a serviceable battery) so the current that the voltage can push round the system falls as the output voltage falls.
Never believe people who tell you that Advanced Alternator Controllers can burn out alternators – the above shows they can not. People who do not ensure a cool air supply for the alternator do burn them out!
The voltage regulation prevents damage to the batteries and the electrical equipment on the boat, so the alternators are equipped with a voltage regulator. Nowadays they are electronic and are built into the alternator itself. The brushes and their holder are often mounted on modern voltage regulators.
If the brushes are not mounted on the regulator you are likely to have a number of wires running to it – Always draw a picture of where these wires go to BEFORE disconnecting them. It is very likely that you will need to remove at least some of these wires if you need to change the brushes.
The brushes mounted on the regulator are far easier to change.
These are typical of the internal voltage regulators found on the LUCAS ACR series of alternators.
Do not take any notice of the number or colours of the wires. These vary from two to about six.
If you are going to do anything with these regulators (like disconnect some of the wires to get at the brushes) DRAW A DIAGRAM first.
Most up to date alternators have the voltage regulator fitted to the slip ring end bracket and visible externally. They usually have the brushes and brush holders mounted at the back and the whole thing, brushes & regulator is supplied as one unit. Some of these are illustrated on the next page.
 |
These diagrams should help you identify the voltage regulators
that are mounted externally and have the brushes and holders fitted to their backs. Some are in aluminium and some in plastic mounted on a metal plate. Beware that some have a blade connection that needs to be removed when the regulator has been unfixed and moved slightly. If you just try to pull them out, you WILL snap the brushes – you need to lift the back end and twist them towards you as you remove them. They may be mounted at any angle on the back of the alternator, although fortunately most are either directly above or below the centre of the machine. The brushes will be pointing towards the centre shaft, so tip the regulator so they lift clear of the slip rings. Just take your time and do not apply any force. Then you will eventually wiggle the brushes out of the machine. If all this sounds too hard, just take a faulty alternator to your local specialist and let them struggle. They should also have all the parts they need. |
If we put all the parts together we get the exploded view shown on the next page.
THIS IS THE WIRING DIAGRAM FOR A TYPICAL ALTERNATOR
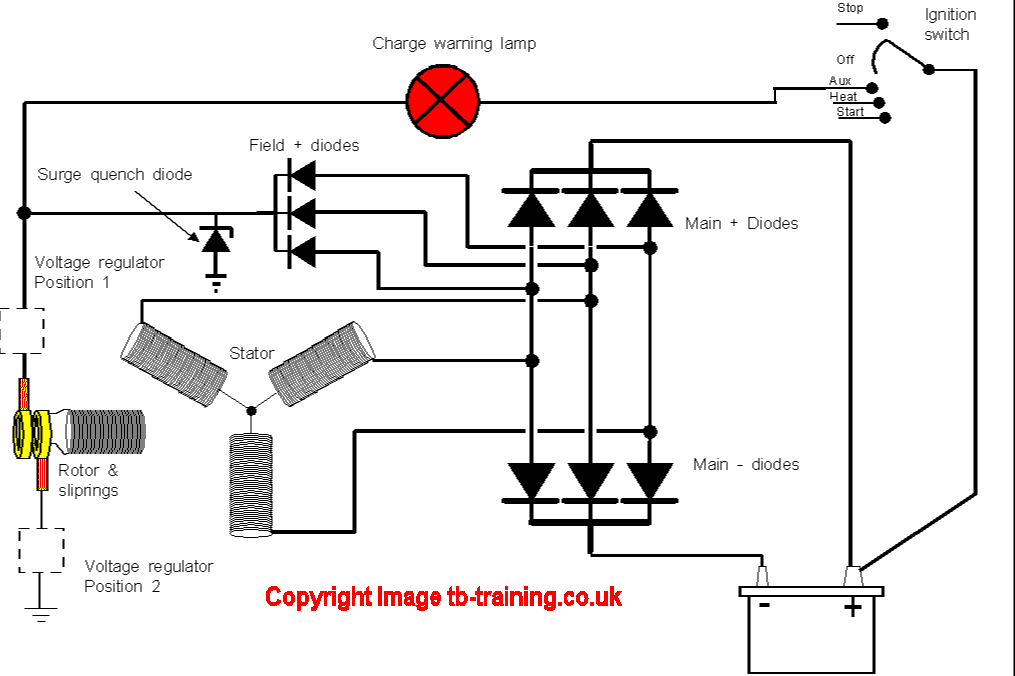
Note the alternative positions for the voltage regulator and also the surge quench diode.
The Surge Quench Diode
When an alternator has its output disconnected whilst the engine is running, the sudden stopping of current flow through the stator causes the magnetic field that was being produced by the generated current to collapse. This causes a high, momentary, voltage surge that will damage the electronics in the regulator and the diodes.
If this happens one hopes that the surge quench diode (if one has been fitted) "opens" to let the voltage surge "run away to earth" so it is safely quenched.
It is probably safest to assume that any particular alternator is not fitted with one, so never disconnect the alternator, battery, or switch a master switch whilst the engine is running – you have been warned.
Occasionally the surge quench diode (when fitted) works, but destroys itself in so doing. If it fails open circuit you will not know because everything works – until the next time someone does something silly! If it fails short circuit the alternator will not charge. In an emergency, locating it and disconnecting it (if fitted) will restore charging – until the next time someone does something silly!
The voltage regulator may be in the positive (position 1 on diagram) or in the negative (position 2) side of the rotor circuit. This is of no consequence until you fit an advanced alternator controller or similar.
In theory, the majority of alternators fitted on small craft will not start to charge unless they get a little extra magnetism in their rotors – in practice, given a sound engine and a strong nerve, they may well, as long as the engine is revved high enough. I do not condone this practice, but it can get you out of trouble.
Normally the extra magnetism is provided by the current flowing through the warning lamp when the ignition is switched on.
Older boats may well have a rising oil pressure switch that sends this current to the rotor as the engine starts – especially if it has no ignition switch and a push button start.
The voltage regulator then starts to turn the rotor current off and on very rapidly.
The longer the rotor is turned off; the lower the average magnetism in the rotor so the lower the output voltage.
Expect the regulated voltage to be between 13.6 and 14.2 volts with a well-charged battery and a "normal" voltage regulator.
WIRING THE ALTERNATOR
There is no universal identity convention for alternator terminals – the best I can do is give a table showing some of the markings in use.
MARKING |
PURPOSE/COMMENT |
| +
B+ BAT BAT+ 9mm male blade |
Main positive output connection going TO THE BATTERY (master switch) |
| D+ | As long as there is NO B or B+ this is the main positive output connection. |
| D+ | If there IS a B or B+ this is an auxiliary output connection for external control gear or split charge relays. |
| - B- E Gnd Bat- | Main negative connection. This either runs to the engine block or the battery negative terminal. |
6mm male blade F DF |
Warning lamp connection. |
| 61 Ind L Aux | Auxiliary output for external control gear or split charge relays etc. |
| W AC | Phase tap for alternator sensed rev-counter. |
The main output terminals will be about 6 to 8mm diameter studs or 9mm male blades (note that they may well be imperial or BA sizes, but the 6 to 8mm should help identify them).
There may well be no negative terminals, in this situation the alternator case itself is the main negative "terminal".
The other terminals will be about 4mm diameter or a 6mm male blade.
If you have a Lucas ACR alternator (large plastic cap on back end) and the original fitter knew what he was doing, the alternator just might be battery sense (see later). If this is the case we can only use one of the two large blades, if it is not the case we can use either, so first we must check.
Set the meter to buzz or diode check. Connect the red wire to the alternator case and touch the black wire to each of the large terminals in turn.
If both large terminals give a buzz or a similar reading (not the "I" for infinity) both are output terminals, otherwise you can only use the one that buzzed or gave a reading – probably the upper one.
The wiring diagram for battery sensing is shown further on.
The letters on the alternator are likely to be different on any particular alternator – these are only used to show the main and warning lamp terminals.
It is usual to wire the alternator to the main starter leads because this gets the current into the large leads as quickly as possible, thus minimising voltdrop.
Do not use a cable size of less that 120/0.30 for the main leads and with high output alternators you will need thicker cable!
If the alternator has no negative terminal omit the negative wire.
If the main negative is connected to the engine block it is quite in order to run the negative alternator wire to any suitable nut or bolt on the engine that is closer to the alternator than the starter – do not loosen a cylinder head bolt!
The size of the warning lamp cable is not critical because it carries a very low current. The warning lamp bulb will protect this cable in the event of damage, so no fuse is required. Do not use an LED for the charge warning lamp, it will not pass enough current. The minimum wattage should be about 2 watts.
If you are of an electrical bent, you can solder a 100 ohm, 5 watt resistor across the warning lamp connections. This will supply the initial current to the alternator if the bulb blows and keep the charging system working.
The main output cable is not normally fused in the interest of minimising voltdrop and joints in high current cables (for reliability).
Belts that do not drive a water-pump may be done a LITTLE tighter, but you risk
damaging the alternator bearings.
Alternator fault finding
Symptom |
Possible Fault |
| Scream/screech when engine revved after initial start | Loose drive belt Worn drive belt section or belt too thin for pulley(s) Worn pulleys (belt should NOT touch the bottom) Occasionally worn alternator bearings. |
| Charge light stays on bright | Faulty
alternator Short circuit to negative between bulb and alternator |
| Charge light comes on intermittently | Worn brushes or
sliprings Loose/dirty connection in main charging circuit. |
| Charge light glows dimly often when engine is revved | Faulty
alternator diodes Worn ignition switch Bad connection between battery and engine electrical circuits |
| Charge light stays off | Blown bulb Worn brushes or sliprings Faulty rotor Broken wire in warning lamp circuit |
| Black dust around front of engine | Loose drive belt Worn drive belt or pulleys Pulleys out of alignment |
| Thwacking noise from front of engine | Drive belt split or fraying |
FAULT FINDING USING INSTRUMENTS
If the above does not indicate a fault then instruments must be used. These procedures take some time because of the need to check maximum output - for which you need a discharged battery, and the need to check the voltage regulator – for which you need a well charged battery.
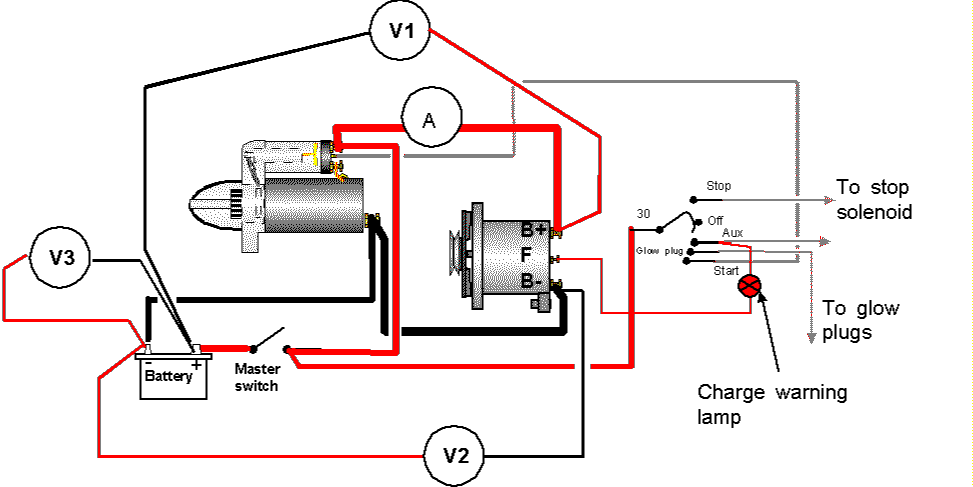
Neither voltmeter should give a reading of much more than about 0.25 volt. If they do the circuit (positive for V1 and negative for V2) is suffering from voltdrop. Start looking for loose and dirty connections or undersize cables.
Turn off all loads.
Rev the engine at a little above fast idle and note the readings on the clammeter (A) and voltmeter V3.
When the clammeter is showing less than 10 amps (it might take some time to drop that far) the voltmeter should be showing between 13.6 and 14.3 (exact figures depend upon make of alternator).
If an advanced alternator controller is in use expect up to 14.5 whilst it is operating.
If the reading is too low either the voltage regulator or the alternator is faulty (remove and have tested by a specialist).
If the reading is too high the voltage regulator is faulty, disconnect any advanced controller and re-check BEFORE trying to change the regulator.
NOTE – British (Lucas) alternators usually are set to between 13.8 & 14.2 volts.
Sooner or later you will hear the term Machine Sensed or Battery Sensed applied to an alternator system. The concept is simple, but the ramifications are somewhat complex – especially when some split charging systems are in use.
Machine Sensed
This means that the alternator’s voltage regulator is measuring the output voltage at the alternator’s (the machine’s) output terminal.
With a simple single battery bank system, and care taken over regularly checking that there is virtually zero voltdrop between the alternator and battery(s) – both the positive and negative cables – then a machine sensed alternator will give perfectly good service.
Machine sensing should also be fine with either relay or manual switch charge splitting to more than one battery bank – as long as the relay or switch is regularly checked to ensure virtually zero voltdrop on the charging circuit.
However it the charging leads (positive and negative) are:-
or if a diode splitter is in use then machine sensing is a recipe for poorly charged batteries and then the resultant sulphation.
Case studies
Diodes always cause a voltdrop – its inherent in the way they work – which traditionally has been quoted as 0.6 to 0.7 volts, but even if we halve this and use 0.3 volts - see what happens
The alternator senses the voltage and regulates it at 14.2volts at the alternator output terminal. The diode drops the 0.3 volts so now we only have 13.9 volts trying to push charging current through the battery. The battery will never reach the potential full charge because we lost that 0.3 volts.
If we take the 0.6 voltdrop figure we actually end up with 13.6 volts trying to charge the battery bank, again it will never reach its full potential.
Careful measurement shows 0.2 voltdrop across the master switch, 0.3 voltdrop across undersized cables, and 0.4 voltdrop across a series of poorly made, loose or dirty connections.
In this case we lose 0.9 volts, so we are trying to charge with only 13.1 volts at the battery, and as a fully charged battery should provide 13.2 volts you see that the new alternator has been wasted.
Things are not quite as bad as the above appears to make out, because the voltdrop is dependent upon current flow. As the battery charges, the current flow drops, so the voldrop also becomes lower. At the very least this will ensure very, very long charging times, even if you ever managed to get a reasonable charge into the battery.
Battery sensed
These alternators have an extra connection so that an extra wire can be run from the battery positive terminal (actually the master switch output terminal for strict compliance with the BSS) back to the alternator’s voltage regulator. This wire carries virtually zero current, but it does allow the voltage regulator to measure the voltage at the battery.
Battery sensing simply means that the regulator measures the battery voltage and not the alternator output voltage.
In case study 1 the regulator would only see the 13.9 volts at the battery and increase the alternator output to 14.5 volts, the 0.3 volts is lost in the diodes, but the battery still receives 14.2 volts to push the charging current through it.
In case study 2 the regulator sees 13.1 volts and increases the alternator output voltage to 15.1 volts. This again ensures you get full charging voltage at the battery.

Battery sensing helps cover up the odd bit of slack maintenance to ensure reliability and is also vital if it is decided to use diodes to split the charge. I would always specify battery sensed if I could (but see advanced regulators later).
Some alternators are supplied as battery sensed, some can be converted, whilst those with external regulators can usually be wired as battery sensed.
If you have a thin, extra wire running between battery/master switch and alternator, it is probably a battery sensing wire.
The extra cost of battery sensed alternators is probably not worth paying because of the greater advantages provided by suitable advanced alternator controllers that nearly always convert the alternator to battery sensing (see later).
The three dotted lines show possible sensing wire connections.
A is definitely fully BSS legal.
B removes any voltdrop across the master switch, but MIGHT need changing to A for BSS inspection.
C takes all the wiring voltdrop into account, but might be more difficult to change if demanded by the BSS inspector.
B&C will both produce a very low, but permanent, current drain on the battery, but no more than a car’s machine sensed regulator does. If you leave your boat for long periods A might be the best because the master switch fully isolates the battery. If you decide to use method B or C it is vital to ensure the cable is always kept well insulated and out of harm’s way, and is also checked regularly for frays and chaffing.
VERY IMPORTANT NOTE
A broken, "fallen off" or resistive sensing wire will cause overcharged & possibly destroyed batteries.
As you SHOULD regularly inspect your critical wiring for problems and also check your batteries this is, in real life, a very minor problem. In any case any decent advanced controller will be measuring output voltage and warn you if it exceeds a safe level. Unfortunately a standard battery sensed alternator system will not do this.