| Back | Home | Index | On |
BATTERY CHARGE SPLITING
There is no need to go to the expense of separate battery banks to supply different parts of a boat’s electrical system as long as:-
Even this is not a problem as long as you can hand start the engine and there is enough charge left in it to energise the alternator field. (Even if it is fully discharged the application of any suitable (dry cell?) source of current between the warning lamp terminal and the main negative terminal should get it charging again).
As soon as you start to complicate and increase the electrical loads you need to start considering the advisability of charge splitting. Even if you have an engine with two alternators, as soon as you fit a high current device requiring its own battery bank, charge splitting might be required. Such things could be:-
How Charge Splitting Works
Many people find it difficult to understand how one alternator can charge a number of different battery banks, yet all the batteries end up fully charged with no over charging.
As far as charging is concerned, just think of a battery as a variable resistor, the flatter the battery the lower its resistance to charging current.
A flat battery has a low resistance, so it will allow a given voltage (say 14 volts) to push a large current through it, thus it starts to charge at a high rate.
A nearly fully charged battery will have a high resistance to the charging voltage (say 14 volts) so that voltage can only push a small charging current through it, thus it charges at a low rate.
Any batteries connected together in parallel (pos. to pos. and neg. to neg.) will each take the proportion of alternator output that their state of charge requires, so over a period of time the flat ones catch up with the charged ones. You end up with a fully charged battery bank or banks.
As long as the inter-battery connections cause no voltdrop there will be no over or under charging.
Problems?
Once you start to connect batteries in parallel you will find that one battery with any fault that causes it to have a lower voltage than the rest – say partially short circuited cells – will cause any other battery connected to it, to discharge itself through the faulty battery in an attempt to charge the faulty battery. This causes the whole bank of interconnected batteries to discharge themselves to the same level as the faulty battery. This is the reason why it is usually recommended that you change a whole bank of batteries at the same time.
This attempt by the batteries to charge a faulty one can, in theory, cause large current flows when the connection is made, so care should be taken when considering and installing such systems.
There are three main methods of splitting the charge from a single alternator between battery banks:-
A diode only allows electricity to pass one way through it, so if two were placed as shown below, the alternator could charge the batteries, but one battery bank cannot discharge itself through the other battery bank.
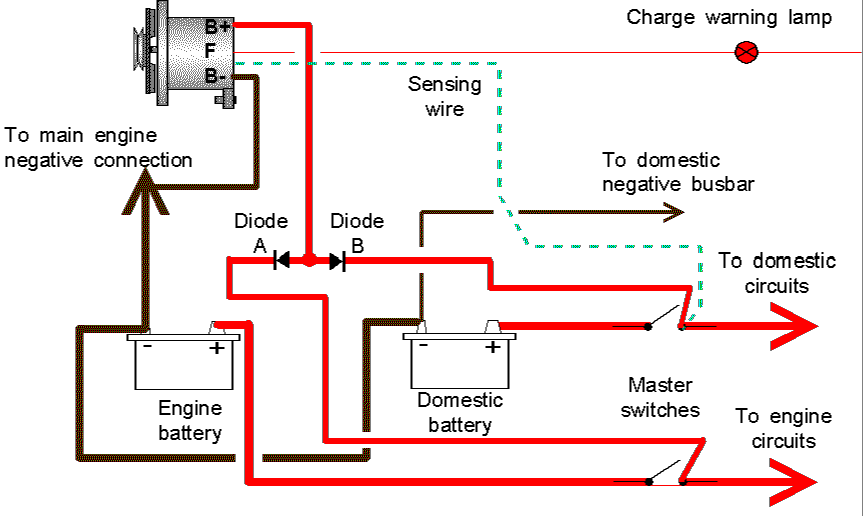
As soon as alternator output voltage becomes higher than the battery voltage the relevant diode will open and allow charge to that bank. When the alternator output voltage is higher than either battery voltage, both batteries will be receiving their correct proportion of the charge.
Note the sensing wire for the battery sensed alternator. There is much debate as to which bank it should sense off. As long as you ensure all master switches are turned on whilst the engine is running, it is probably marginally more advantageous to sense from the bank most likely to be discharged. If you do this, any voltdrop in the charging circuit carrying the highest current will be taken into account.
The manufacturer can fit as many diodes as they see fit, so one alternator can be used to charge more than two banks, however there are down-sides diodes.
Problems
However the manufacturer always quotes the split charge diodes capacity as the highest figure they can. This often leads to small print in the instructions giving maximum ambient temperatures and minimum airflow speeds across the diode if the full rate is to be used. In may cases you have to buy a far larger diode than apparently required, because you cannot provide either the minimum temperature or the air flow.
Fault finding on charge split diodes.
Set a multimeter to the diode test position (or wire a simple test lamp that contains its own supply).
Connect one lead (bulb or meter) to the alternator input terminal and touch the other lead to the other two terminals in turn. Note the bulb or reading.
Reverse the connections.
Both output terminals should give the same results. The results being bulb on one way and off the other or meter giving a high reading one way (probably an upper case "i" on the wrong side of the display) and a low reading the other (probably a number below 900).
These appear often to be favoured by yachtsmen and at first sight appear a very simple solution to charge switching.
A four-position switch is fitted giving OFF, BATTERY 1, BATTERY 2, and BOTH.
It is wired as shown below.
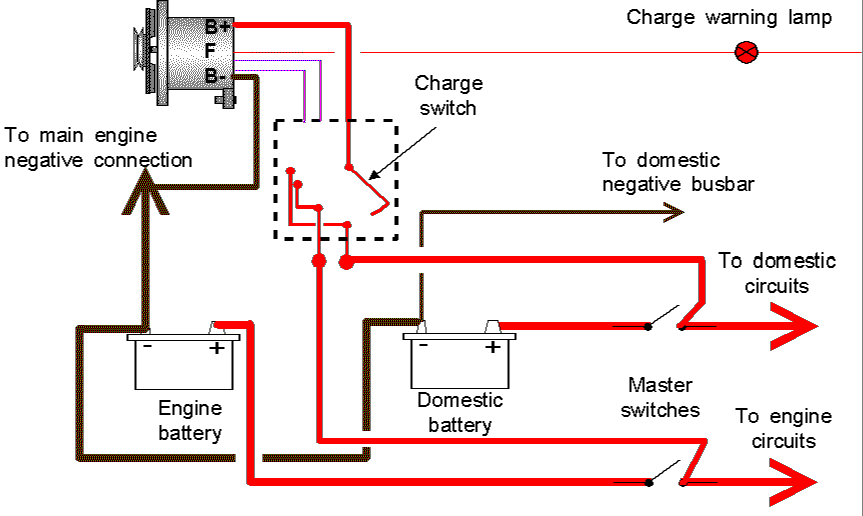
The switch is shown in the off position. Move it one click clockwise and the domestic battery is connected to the alternator. One more click and the domestic battery is disconnected and the engine battery connected to the alternator. One last click, and the two "close together" points are connected by the switch so that both batteries can be charged.
These switches are also sometimes installed as a single master switch.
Problems
Even if it is a make before break switch, can you be sure that old age and wear will not prevent it operating like this?
Some of these switches are equipped with extra terminals that allow you to turn the rotor current in the alternator OFF whilst switching takes place. This sounds an attractive way of solving at least one of the problems, but all the modern alternators I have seen would require modification to the rotor circuit. This might not be difficult for an autoelectrician, but it would make it difficult to solve a breakdown by simply fitting an exchange alternator.
Exactly how many extra wires are required depends upon how the rotor circuit is regulated. If the voltage regulator were in the negative side a single wire from inside the alternator and a negative wire from any suitable point would suffice.
If the regulator were in the positive side of the rotor circuit the two wires as shown would be required.
In my opinion switches used for charge control present too many opportunities for problems to creep in and are best avoided.
This is a very high current relay that is wired to join the positive sides of the battery bank together as the alternator starts to charge, and disconnect them when the alternator stops charging.
For marine use specify well above the alternator’s quoted output – say 180 amps.
The circuit is shown below:
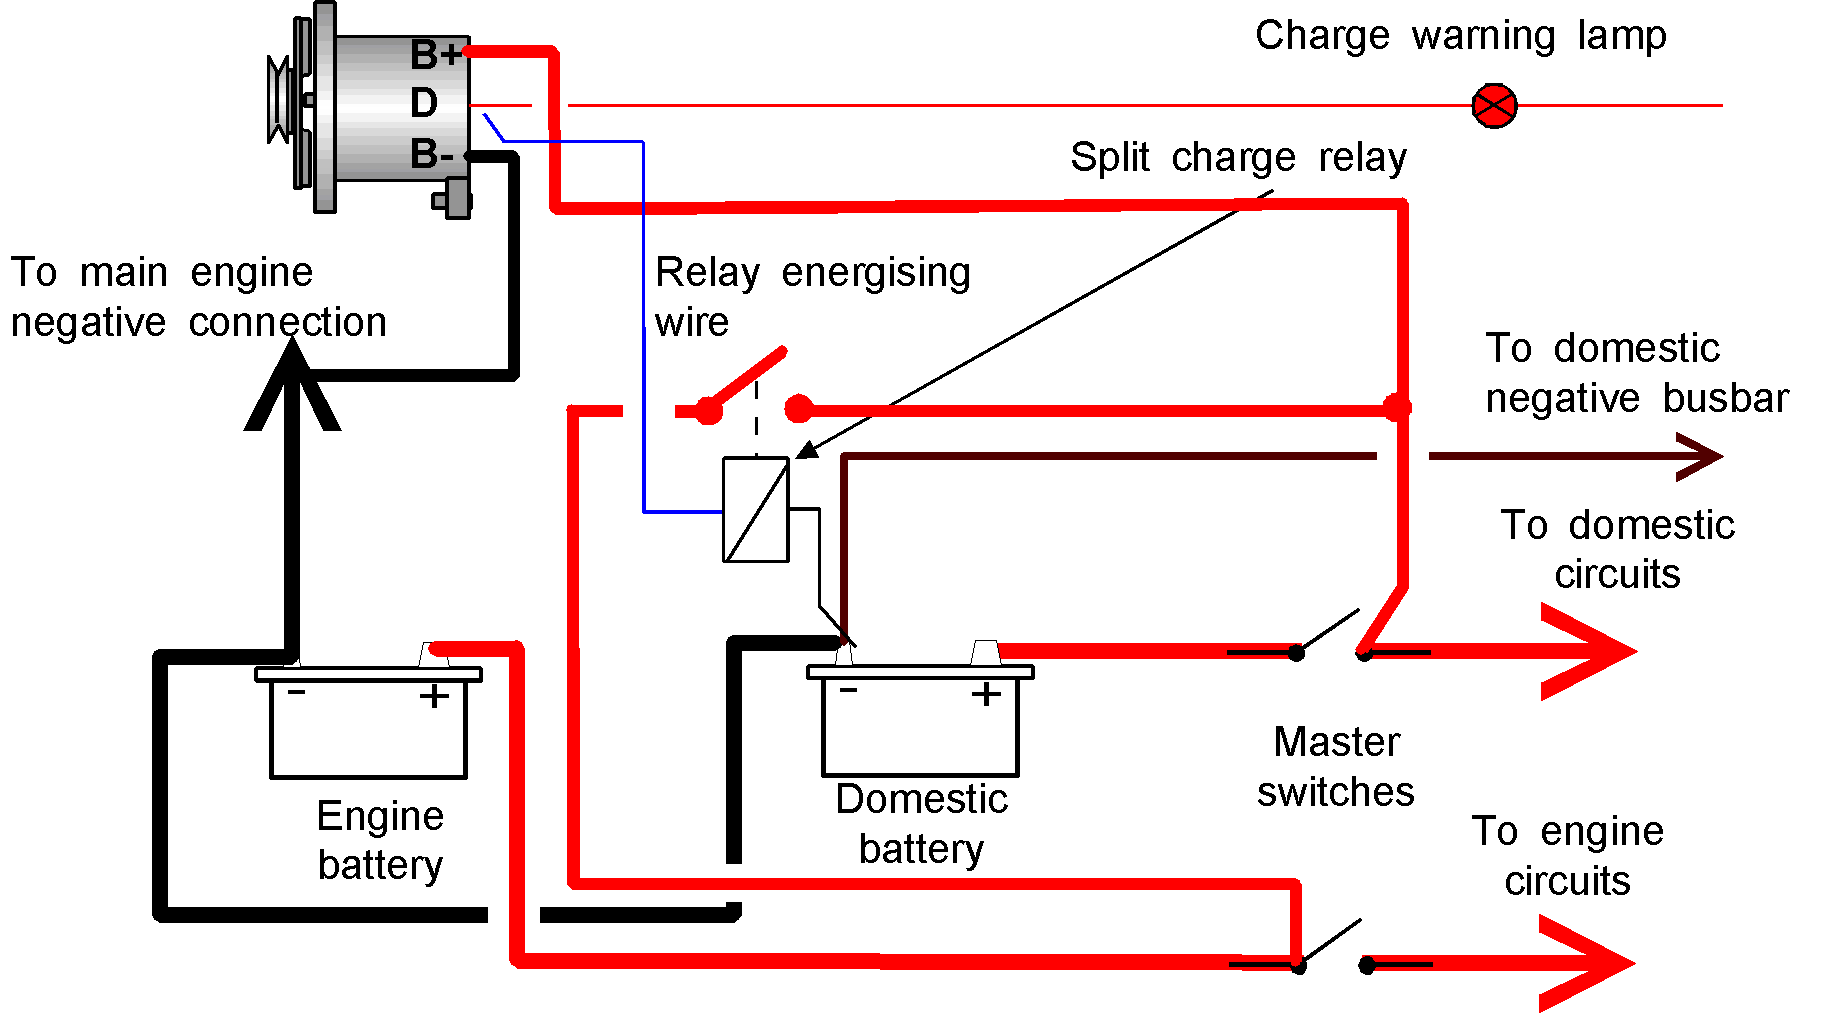
A feed for the relay coil is taken from any point on the alternator that has zero volts on it when stationary and charging voltage when running. This could be:
The warning lamp connection is the one that most alternators will have. In theory, making the connection here could make the alternator slow to energise. If this does happen simply increase the wattage of the warning lamp bulb.
As soon as the alternator starts to charge, the relay contact will come together joining all batteries as one big bank. From then on each battery will take the proportion of alternator output that it needs.
When the engine stops the alternator output falls to zero, so the contacts open, isolating the battery banks from each other.
Because the relay is a mechanical switch there should be minimal voltdrop, so a machine sensed alternator can be used with split charge relays.
Problems
Regular checking of your batteries will prevent this happening.
Fault finding
If there is a major difference you can assume the device that is splitting the charge is causing voltdrop on one side (once you have ensured the wiring is OK).